Camera Ratios and Picture Dimensions
Co-ordinating Camera Ratios and Picture Dimensions
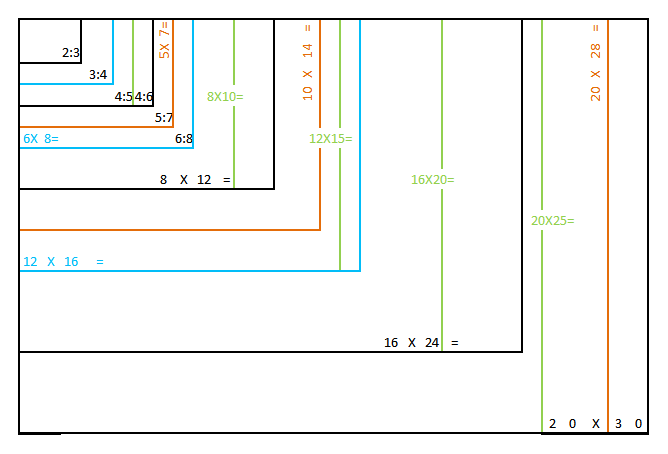
Have you ever taken a picture of a cute little kid and thought – I should have that printed as an 8X10. The print, however, cut the top part off of your photo. What happened? Conquer this issue with a little planning and the visual aid (Fig 1) in this blog post. Find your perfect match between camera ratios and picture dimensions.
You probably took the picture in the typical camera ratio setting of 4:6. This setting is called the aspect ratio. When made twice as large, that would be 8X12. Therefore, two inches got lopped off when you developed it as an 8X10 Photo. The 4:6 aspect ratio on your camera is a good choice if you like to develop pictures into the following dimensions: 2X3, 4X6, 8X12, 16X24, or 20X30.
One fix to prevent this from happening next time is to upload the photo into the program and adjust the dimensions. Another option when taking your picture is to stand back a little farther from your subject. This leaves an extra border that can be excluded from your developed picture. Ultimately, it’s best to change the camera setting to the proportion that you’d like to develop.
Choosing Camera Aspect Ratios
Choosing your camera’s aspect ratio setting is mind-boggling at first. There are several factors to consider at the same time. First of all, what are your goals and interests in photography? Next, how do you want to use your pictures? If for decor, what is the style you want? If for business, what format does your company require? Finally, how do you want to display them: in frames, on products, or digitally? Let’s dust off our math skills, make some goals, and decide the best way to display those awesome pictures.
It’s harder if you are not math-minded because the first step is the conversion of the camera’s aspect ratios to picture sizes. The pictograph (Fig 1) above helps with this.
Steps to convert aspect ratios :
- Find the six camera aspect ratios in the upper left corner (Fig 1).
- Notice that these are in the corners of boxes that are color-coded.
- Find another box of the same color frame.
- Use the picture size you found because it is an equal proportion.
Example: Choose a camera aspect ratio of 5:7. It is in the corner of an orange box. The next larger orange box is 10X14. Therefore, 5:7 is an equal proportion of the picture size 10X14. If you set your camera’s aspect ratio to 5:7, you can develop that picture perfectly into a 10X14 size picture.
In this case and most of the sizes, you simply multiply each of the camera aspect ratio numerals by two. That equals one picture size. Then you multiply those two numerals by two and get the next larger size and so forth. Some sizes don’t work out that easily, however. The picture frame size of 16X24 does not double to make the next typical picture size of 20X30. Multiplying the ratio it came from (4:6) by five does equal the picture size 20X30. That makes 4:6 and 20X30 equal proportions.
Picture Dimensions and Frame Sizes
Picture dimension and frame size are not always equal. Retailers frequently advertise frames by their outside measurements. A mat is added to the inside of the frame making the picture viewing size smaller yet. Check size descriptions carefully. Shop for your frame before developing your picture to get the best prices and the look that you want.
Then there is the issue of deciding what type of pictures look best in the different developed sizes. Personal taste largely defines this, but other factors also play in here. That gorgeous beach wave scene stuffed into a small frame cries to be let loose. The headshot of Uncle Joe doesn’t command the dominant space of a large wall. A mountain panorama needs a landscape format and a waterfall asks for a portrait view. Study your scene before deciding.
Fads and Technology Effect Picture Dimensions
What complicates this further is decor fads and camera technology. They change the most commonly used sizes over time. After 1870 people developed portraits into a format called cabinet cards with a size of 4 1/4″ X 6 1/2″. Popular in the 1950s were happy snaps that measured 2 1/4″ X 3 1/4″. By the late 1980s, photographers developed 35mm camera pictures into 3.5″ X 5″ photos. Finally, the late 1980s brought into vogue the 4″ X 6″ photo.
The larger photos of those eras also had their own trends. The problem today is that retailers still sell the old frame sizes. These frames are different proportions than the typical default settings on the cameras of today. Hence, this article is here to help clear away some of the fog. Become familiar with your typical picture uses. Then take time and learn how to change your camera settings Your camera ratios and picture dimensions will live happily ever after.